Pages

Wednesday, July 10, 2013

I've switched to Bloglovin'

<a href="http://www.bloglovin.com/blog/6442509/?claim=ztb55yhjp2u">Follow my blog with Bloglovin</a>

I'm claiming my blog with this post, since google reader has shut down, I switched to bloglovin'. I really like it! I'll be posting again soon! I promise!!

Tuesday, April 30, 2013

Unfaithfully Yours

Yes, it's true, I have been unfaithful. I am attracted to someone new and have been seeing them every day without shame! Did I get your attention?!

Well, as you know, I am a multi- crafter, I think many people who craft are, and although crochet is my true love, every once in awhile I betray my hooks and learn something new.

Tatting is something that has intrigued me for quite some time, but since it is time consuming, I just didn't ever get around to trying. Last year I bought myself two shuttles and a book and added learning to tat to my list of new year's resolutions for 2013. After seeing a few projects that my friends in my crochet groups had tried, I was inspired. I tried shuttle tatting a couple of times, but it is quite complex and decided to start with needle tatting. I could only get my hands on a mattress needle to start with, so I used it to get the gist of how it works and help me with tension, while I waited for my tatting needles to come in the mail. This is a whole new world to me and I am so excited!

I followed a few patterns, and also experimented on my own. In the mean time I have been pinning away on my Pinterest board and researching blogs of some very talented tatters. One of them is Totus Mel . She is extremely talented at needle tatting and has some great videos on YouTube too!  Another is Yarnplayertats there is some incredible tatting going on here folks. There are many others, these are only two and I also found RustiKate's video to be very helpful.  In Italian the are some wonderful video tutorials byDaniela. I just thought I would add these links in case any of you are inspired to start learning this incredible art.

I just completed this set and I really must say thank you to my friend Le Giugge, because she is the one who gave me the pattern. When I saw hers, I fell in love and just new I had to make it! Thank you also goes to my friend Daniela, who has shared her knowledge with me and Mindi who gave me some beautiful patterns. Happy tatting! :)


Saturday, March 23, 2013

Love at first..... Cluck!

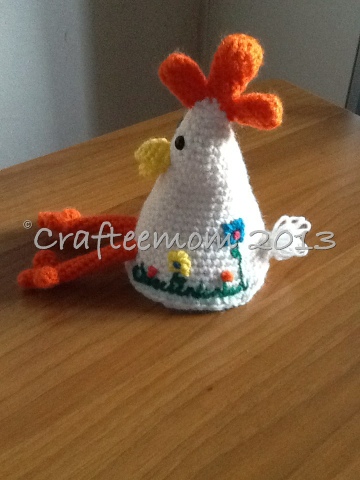
You know when you see something, and just HAVE to make it , RIGHT NOW? Well, that's what happened to me when my friend Mindi showed me the adorable hen she'd made. Everything else I had to do went out the window. Ironing....yeah right. Lunch..... Who needs to eat, I'm supposed to be on a diet anyway! I was on a mission to make this NOW! Here is the original link to the pattern, which is actually an egg cozy. I made mine bigger, stuffed it, and closed it at the bottom, because I have other plans for it, which you will see, if you stay tuned.......

Spring is on its way, hooray !!!


Tuesday, March 19, 2013

The Fine Line

It's been a long time since I've posted, I know, and this is not how I planned my next post to be, but here it is anyway. I hope you don't mind. I promise the next will have pictures and I even have a couple of tutorials planned, so please bear with me...

Today's post is about a recurring topic among designers and crafters and all of us who publish our work on the web, only to have it copied , stolen and/ or passed off as their own.

I belong to different craft groups on Facebook, as many of you know, and every once in awhile this comes up, because most of us publish our work on blogs, Facebook, Flickr etc.....
The groups I belong to have an average of 2000 members and so, as in any small town ( we can look at it like this), there is bound to be at least one person, lurking behind the scenes, waiting to take advantage of  many trustworthy people who want to share their craft with other crafters who truly appreciate the hard work and great ingenuity it takes to design or make something. In the past month, this has happened twice, in two different groups. In the first,  a troll copied photos from a very talented woman's blog and posted them on their blog, passing them off as their own. In the second, a troll downloaded photos, removed the trademark and logo from the photos, and posted them to their page, again passing them off as their own. In both cases these trolls were notified that what they were doing  is unethical and illegal, and the reply, was more or less, "I didn't do anything wrong, these were found on the web".

Slightly different, but related

A friend of mine, who is a talented crocheter asked me about selling her things and that she'd taken inspiration from things she'd seen on the web. Is it okay to sell them, or would she be copying?

My opinion:

First of all, the trolls in question have violated laws and rules established and published in these groups. Besides being illegal and unethical, I can only feel sorry for these "people" who may know the technical part of crafting, but obviously don't have a creative bone in their body, and therefore have to steal and copy other people's creativity. This is something that really infuriates me, because in my book, RESPECT is the number one RULE IN LIFE. That includes respect for others' ideas and work as well.

Second,
We all get inspiration from the things around us, including the web. As far as answering my friend's
question goes, you should ask yourself this,"  Did I copy? Am I trying to make the same object, without permission?" or did you see something you like, maybe use the same stitch or shape or color, or make something similar, but in a different way?  If the answer is yes to the first part, in my opinion, you are doing someone wrong. If you are a truly creative person, you should give the respect you want to receive for your work, by respecting others'.

The moral here: RESPECT , HONESTY, ETHICS. Terribly obvious to some, oblivious to others :(

On a final note, I am a believer in karma and am sure that the culprits will get what's coming to them sooner or later....

Sorry for the rant, but I had to get it out. You're welcome to leave your opinions, I'd love to hear them!

Monday, March 18, 2013

coin purse

© published with permission of Roberta Catiglione. Property of Roberta Castiglione 2012.

Saturday, September 22, 2012

Cortinas Portuguesas-Portuguese Curtains


I left my heart in Portugal, along with many friends. So whenever I get a chance, I go back. Although there are many places I've yet to visit, Portugal is and will remain one of my favorites. If you've been, you know why. If not, you should go. In my next post, I'll post some pictures in order to convince you, but for now, I'll get back to the craft at hand.

On my recent trip to Lisbon, I found some lovely dishtowels and a table cloth. This, for me, is the perfect souvenir because it's something I use daily, and reminds me of the place I love. So I grabbed them, and while I was choosing them I had a thought....... I could make the dish towels into kitchen curtains! I'd been looking for some cute fabric  to make curtains with, but hadn't found any, so this was perfect. the fabric, it even has a name "Lovers". It has a kind of Portuguese Fado written by a woman whose love has gone away to Brasil. It's very sweet.


Here's a similar dishcloth, since I forgot to take a pic before I started!


Anyway, I found a crochet edging that I liked and modified it a little. You can find the edging here and my mods on my ravelry project page.


 After fighting with my sewing machine, I opted for hand sewing the loops and then embroidered the top with the same yellow cotton I used to crochet the edging. You can find the stitch here. By the way, this last site is the best I've found for embroidery techniques and stitches. Sarah has great photo tutorials that make embroidery easy, even for novices.


Here's the FO! Hope you like them, I am really pleased with how they turned out! It just goes to show the difference a little handwork and love can make :)


Wednesday, July 25, 2012

How to sew an invisible seam for a crochet garment

The other day, while finishing a tank top I made for myself, it came to me that not everyone, and especially new crocheters, know how to sew a garment together. So ,while I was at it, I decided to take some pictures and show you how it's done....

Before starting, you should know that you'll be sewing as if you were crocheting in a" back loop only" and "front loop only "style. If you're new to crochet, that means you will only pick up half the stitch with your yarn needle (usually you'd do this with your hook). Hopefully, this will be clear following my photos. Why sew, instead of crochet? Because, even if you use the flat braid method, you'll still get a ridge. If you follow these steps, you should not be able to see the seam.

If you are planning on blocking, it's better to block the individual sides before sewing them together. You should use a grid or measuring tape when doing this, because you don't want one side to be blocked bigger than the other! I didn't block my top, because it's cotton and I know I won't have the patience to re-block every time I wash it, since I plan on wearing it often. I always leave long tails when crocheting and sewing (if I haven't made a knot). This is useful for putting the right or wrong sides together as well as for making knots. I should tell you, that I usually weave in the ends and do not knot when I crochet, but when making a garment, espescially one that will be thrown in the washing machine, it is absolutely necessary to make knots. You  wouldn't want hours of work to come apart at the seems would you? So, when I'm finished, I either make a surgeon's knot, or a triple knot and pull as tight as possible, then cut as close as possible to the knot. If you've made the knot correctly, this will not pull your work. If you have a little bit of yarn sticking out, you can put a little clear nailpolish on it to prevent from fraying, but you should cut as close as possible, like I said. I have used yellow yarn for better visibility but, obviously, you'll use the same yarn you used for your garment.

One last note: If you're sewing a seam for a very lightweight garment, you can choose to do only the "back loop only" part and skip the front. When you do both sides, the seam is heavier, but has a stronger hold, because you've worked it twice. If you have a lace weight garment, doing only the back side is better because the seam will stay light and is absolutesly invisible. I do recommend doing both sides in the shoulder seams, because there is more stress in that area when the garment is worn, but you may not even need it there if it's a delicate one. I have worked both sides on my top.
The photo tutorial shows how to do the side seams, but after lining up your work, you should start at the shoulders, using the same technique.

Here we go.......


First, you'll need to place one side right side up and the other, on top, right side down. Aline the sides so that they match perfectly, and place stitch markers along both sides ( I use paper clips. A trick I learned from futuregirl )


As you can see, I didn't put the markers through the actual stitches, but through the spaces instead. This makes it easy to remove them, but is only possible if you have done an openwork garment. Otherwise, put them through the stitches.

Now measure your yarn and cut. Two and a half lengths of  your seam is usually enough ( one and a half if you're only working one side). Thread you needle, do not make any knots.
Start at the bottom, leaving a long tail of yarn and make a circle, which is an imitation of a crochet stitch.
The above photo is solely to demonstrate how you will be sewing ; through the back loop of the stitch.
Now,  with your hand underneath, hold both sides, so that your stitches are almost touching, and run your needle through the back loop only (i.e. the one on the wrong side, which is also closest to you)and pull through.As you complete each stitch, pull so that it's snug, but not too tight, or you will ruin the invisible seam.

You will be sewing in a serpentine or S fashion. Notice that I have not pulled my stitches. This is only so that you can clearly see them, but yours will be closed as you work.Continue sewing like this all the way up the sides.
In the photo above, I've turned my work to show you how the seam is invisible on the other side. If you have chosen to do only one side,when you get to the top, go back down a stitch or two and tightly knot your thread to a stitch. Cut and go back down to where you started. Thread your needle with the tail, work up a stitch and knot as before,cut and go on to the other seam. If you want to do the other side, proceed as follows:
Turn your work over to the right side, run the thread through as shown below, picking up the front loop only (which is still the closest one to you)


Now, sew through as before, working through every front loop only, until you get back to the bottom, turn your work again and bring the neddle to the back and up a stitch. Now bring the tail up a stitch and make a secure knot using the two ends. (This is not shown)  Pull as tight as possible and cut as close as possible.
Now you're ready to sew the other side seam.
Above I've shown the finished seam and left my thread aligned, so that you can see where I've ended.
Here it is on me, the seem is almost aligned with the one on the white one underneath.
Invisible! Once you finished your seams, you're ready to do the edging and then your project will be complete!

I hope this tutorial has helped you. As always if you have any questions, need help, or have found an error, let me know. I'll be glad to help! :)




Thursday, April 5, 2012

Our Patch

 A few weeks ago I posted about Mettiamoci una pezza. A special project for the city of L'Aquila which was destroyed during the 2009 earthquake.  Tomorrow is the three year anniversay and the cultural association Annimamersa is covering the broken and gray city with color........ beautiful "patches" to patch up what is broken.  I have been teaching crochet in the elementary school here and we decided to take this on as a project, so I feel very proud to show you all our FO. Each child made a 10x10 cm square (some made more than one!) and then I embroidered their initals and class, and crocheted them together. They really worked hard and showed incredible enthusiasm for this project, with true spirit for helping others. Hats off to the kids and tomorrow our hearts will be in L'aquila, along with our "patch"

Wednesday, March 7, 2012

Congratulations ravelry!!!

Since I hadn't started blogging when ravelry reached it's 1,000,000th member, now that they've reached 2 million, I just have to say CONGRATULATIONS!!!

Ravelry is my absolute favorite website. It is the best, most organized resource for crocheters and knitters around the world. There you will find; an incredible pattern library ( so many free ones too!), Help from experts, groups of interest, swaps, CALs and KALs, translations of patterns into many languages, the chance to see what other people have made ( you could spend hours just looking at beautiful FO's!), and much, much more.................Just in case you didn't already know!

Best of all, it gives you a chance to make new friends who share your love of the fiber arts. Even though I never thought I'd be the type to make friends over the internet, I have, thanks to ravelry. It really means a lot because, where I live, I don't know anyone who crochets, and it's so nice to be able to share what I've made with someone who really appreciates it, and to see the beautiful things they are making too!

So thank you Jess, Casey, Mary-Heather, and Sarah for creating and maintaining this incredible place that each and every  two million of us love♥ and congratulations on a job well done!

Keep calm and ravel on......................................................................................................


Monday, February 20, 2012

Patching things up

Today I wanted to share a project that I am participating in, in hopes that, if you crochet or knit, you might too. It's called "Let's Patch it" in Italian "Mettiamoci una pezza". In April of 2009 the city of l'Aquila in the Abruzzo region in Italy was destoyed by a terrible earthquake. Today, almost three years later, it still has not been re-built. Every year Animammersa, a local organization, does something to call people's attention to this city in hopes that something will be done. This year, they are organizing a giant yarn bomb/ urban knitting(and crochet) event on April 6th to commemorate.  They are asking anyone who wants to participate (even from far away) to make a "patch" and send it to them. Then they will put them together and display them in the city's center. The pieces should measure either 40x40 cms or 20x20 cms, or 50x50 cms. or 25x25cms. You may use any yarn,stisch, color  or method of your choice. Even a loom! They are also accepting flowers (crochet or knit of course) the link to the site is here. Please scroll down for English. If you do participate, don't forget to attatch a tag with your name and the city you live in. Please send them, by March 24th to:

Associazione Culturale Animammersa
c/o Patrizia Bernardi via Strada Statale 17 Bis SNC
67100 Paganica L’AQUILA
ITALY

I'll be participating with the crochet group I am in on facebook, but have decided to make this our class project in the two fifth grade classes I am teaching crochet to. The kids are really excited!

If you can, please spread the word. The more we are, the more beautiful l'Aquila will be! Hopefully not just for one day :)

Tuesday, February 14, 2012

Happy Valentine's Day


Well, today is Valentine's Day and although in Italy it's a couples' holiday, I much prefer the U.S. version, or rather, a day to tell people that you love and care about just how you feel! I know many people think that Valentine's day is a bunch of comercial hype, but I don't, because I think that any holiday is what you make it. So if you are worried about flowers, candy, what to buy etc.... then it will be a commercial holiday, but if you use it as a day to tell someone just how you feel, which is something that most people don't do every day, then it wil be a special, heart-felt holiday.

As I've said before, I like to decorate seasonally and for holidays too, so there's always something nice hanging somewhere in the house. I also have a love for wreaths, so my latest project is a Valentine's day wreath. The crocheted heart was made as a Social Crochet  project. But you can get the original pattern in English here. The other hearts are made with felt. If you want to make one, you can add as many hearts as you like. I only wanted three, because I like to keep things simple.

Unfortunately, my naughty kitten got ahold of the heart and pulled a couple of stitches, so it's not perfect : /

Also, as a special gift, the wonderful people over at ravelry created some fantastic valentines that you can send to your friends. Just like when you were a kid in school. Gotta love it! Peace and Love

Monday, January 30, 2012

sisal crochet


If you read my last post, you must think I'm really crazy now, because after I bought all that gorgeous yarn, here I am crocheting with sisal cord! One of the things I LOVE about crochet is it's absolute versatility. You can completely alter  a pattern by using a different size hook or a different type of material. You can crochet with wire, old t-shirts, paracord, string, plastic bags, raphia or anything your heart desires. I like to change sometimes, so I decided to use sisal cord, which I love, and is great for household items.It can be used to make trivets, placemats, table runners, picture frames, you can even make a doormat with it! I decided to use it for a planter in this case. I hope you like how it turned out! Imagination is the key♥


Friday, January 13, 2012

Sales


Well, it's that time of year again, the sales are on all over Italy and while most normal people are out buying clothes and shoes, I am buying yarn! Yes, that's right I'd rather have some delicious yarn than shoes! Call me crazy, but chances are, if you're reading this, you won't because you'd rather buy yarn too!  I headed over to filmarket this morning and got some good deals. This place is huge and it's better to go with some things in mind or it can be overwhelming! Most of what I bought I'll ust to make items to sell but this  I am keeping all for myself!
Isn't it gorgeous??!! 75% kid mohair 25% silk and it was a steal! Now I just have to find a project that suits. Any ideas??

Tuesday, January 10, 2012

Snowflakes


Well, it's winter and we haven't seen any snow this year, so I'm hanging up these gorgeous flakes I made last year as a good omen. The pictures really don't do them justice! There are many free patterns ravelry on and I also used this wonderful  book . I've made several and they look really beautiful if you hang them on nylon fishing or jewelery line in the windows. I'd like to share how I blocked them with you. There are different methods; starching, sugar/water (which tends to turn yellow after awhile) or glue/ water which I prefer.


You will need:
* A corkboard
  • Stainless steel pins (they must be stainless so that they don’t rust!)
  • a thimble
  • small pliers
plastic document covers
  • a blocking chart, I’ve made three to cover the whole board. You can make these yourself by using a ruler and making three lines that cross in the middle.
  • a solution of 1/2 craft, Elmer’s or vinylic glue and 1/2 water. Make as little or as much as you need for your snowflakes.
glitter ,if desired

First, draw your chart and fit it in the plastic cover. You’ll need one chart for each flake. Then with pins or tacks secure the plastic covered chart to the cork board.

If you want glitter on both sides of the flake, sprinkle a little on the chart before you put the flake down.

Next, mix the glue and water.
Then, take one snowflake and completely immerse in mixture, get your fingers in there, it’s a messy job,but someone’s gotta do it!

Squeeze out the excess mixture, blot with an old towel and place on top of the plastic covered chart. Now, carefully open completely and, starting at the top, place pins all along the outside of the flake. Use a thimble to push the pins or you fingers will hurt! Then place pins on the inside of flake, and especially anywhere there are picots etc…
Once you are finished with the pins, sprinkle glitter evenly.

 (sorry this picture is so dark!)
Let dry 24 hours and carefully remove the pins with the pliers,again, to save those precious fingers! Voilà! Your beautiful snowflakes will hang all winter long!


Fingers crossed!

Hello everyone, I know I haven't posted anything interesting, and I promise I will in the next couple of days. In the meantime, I've entered this giveaway for this fantastically cool yarn bowl. Keep your fingers crossed and maybe I'll win!! Check out the Bubiknits blog!

Wednesday, January 4, 2012

update

Hi! I'm trying to update my blog and still trying to figure out exactly how this works, so please bear with me. Thanks!

Saturday, December 24, 2011

Just in time to say Merry Christmas!

Well, I must apologize, because I've had no time to post, but I wish everyone a very Merry Christmas (if you celebrate it) and  Happy New Year!!!

Wednesday, November 16, 2011

Change of Season (and crafts to go with it!)

Although I was born in Summer, my favorite seasons are Spring and Fall. Why? Because I love the change of color, and luckily, here there's a lot of it!  It's true, Fall officially started a few weeks back, but we had sort of an Indian Summer and so the leaves are really beautiful shades of yellow red and brown right now. The best time to collect and press them, so that's what I did!

The truth is, I was planning on making this last year, but never got around to it, so it was haunting me. Although it takes a couple of days to make (because of drying time) it is SO worth it and the pictures really don't do it justice. I love to change the decorations in the house according to the season and this fits perfectly, it would also make a nice centerpiece for your Thanksgiving table, although I've already made something else. So, go gather some leaves, place them flat in between two (or more) sheets of newspaper, or paper towel, then place them on a flat surface, cover with more paper and put some heavy books on them so that they're completely covered. Leave them like that for several days (mine were there a week). When they're nice and dry and flat, you're ready to start.

You'll need:
rice paper for decoupage, I like voile(the thin stuff), but thicker is okay, however, it will be more opaque.
a mixture of craft of Elmer's glue and water.60/40 is about right, but I just play it by ear (or eye, if your speaking Italian ) It's best if you make it up in a closeable jar, so you can save it between drying times.
2 medium sized paint brushes
Leaves
Varnish (optional)
Hurricane or glass container or jar
an Exacto or craft knife

First, tear your rice paper into fairly big pieces, as in the top photo. The second photo shows a straight edge, you DON'T want that, or the seem is likely to show. Line your work surface with a plastic table cloth or something non-stick.  Place the paper aside and paint the glue mixture onto the hurricane like so:


Then carefully place your rice paper onto the glass, slightly overlapping it so that there are no holes. Cover the entire jar and if you can't fit the paper eveny to the top seem, don't worry, just let it stick out over the edge. Once it's completely covered, give it another paint-over with the glue mixture, this will make sure that it's wet enough so that the overlapping  doesn't show when it's dry. DO NOT overdo it though or the paper will tear.Let dry for a couple of hours.
When it's dry, take an exacto knife and trim the edge.
Now, repaint the whole thing with the glue mix and then, one at a time, paint the back of the leaves and place them where you want them to go. Be patient and careful, so that they don't break. Hold them a second until they stick and paint over the top too.
Unfortunately, my batteries died here so I didn't get of a pic of the leaves being placed, but you get the idea....
Once you have finished covering the glass, paint over and let it dry for several hours or over night. When it was dry I painted it again because some of the leaves weren't flat. If your stems stick out, you can cut them at the base of the leaf and glue them on seperately, as close as possible. When it's completely dry, add a coat or two of varnish to protect it. That's it! A beautiful fall hurricane. I hope you liked the tutorial.