Pages

Friday, January 13, 2012

Sales


Well, it's that time of year again, the sales are on all over Italy and while most normal people are out buying clothes and shoes, I am buying yarn! Yes, that's right I'd rather have some delicious yarn than shoes! Call me crazy, but chances are, if you're reading this, you won't because you'd rather buy yarn too!  I headed over to filmarket this morning and got some good deals. This place is huge and it's better to go with some things in mind or it can be overwhelming! Most of what I bought I'll ust to make items to sell but this  I am keeping all for myself!
Isn't it gorgeous??!! 75% kid mohair 25% silk and it was a steal! Now I just have to find a project that suits. Any ideas??

Tuesday, January 10, 2012

Snowflakes


Well, it's winter and we haven't seen any snow this year, so I'm hanging up these gorgeous flakes I made last year as a good omen. The pictures really don't do them justice! There are many free patterns ravelry on and I also used this wonderful  book . I've made several and they look really beautiful if you hang them on nylon fishing or jewelery line in the windows. I'd like to share how I blocked them with you. There are different methods; starching, sugar/water (which tends to turn yellow after awhile) or glue/ water which I prefer.


You will need:
* A corkboard
  • Stainless steel pins (they must be stainless so that they don’t rust!)
  • a thimble
  • small pliers
plastic document covers
  • a blocking chart, I’ve made three to cover the whole board. You can make these yourself by using a ruler and making three lines that cross in the middle.
  • a solution of 1/2 craft, Elmer’s or vinylic glue and 1/2 water. Make as little or as much as you need for your snowflakes.
glitter ,if desired

First, draw your chart and fit it in the plastic cover. You’ll need one chart for each flake. Then with pins or tacks secure the plastic covered chart to the cork board.

If you want glitter on both sides of the flake, sprinkle a little on the chart before you put the flake down.

Next, mix the glue and water.
Then, take one snowflake and completely immerse in mixture, get your fingers in there, it’s a messy job,but someone’s gotta do it!

Squeeze out the excess mixture, blot with an old towel and place on top of the plastic covered chart. Now, carefully open completely and, starting at the top, place pins all along the outside of the flake. Use a thimble to push the pins or you fingers will hurt! Then place pins on the inside of flake, and especially anywhere there are picots etc…
Once you are finished with the pins, sprinkle glitter evenly.

 (sorry this picture is so dark!)
Let dry 24 hours and carefully remove the pins with the pliers,again, to save those precious fingers! Voilà! Your beautiful snowflakes will hang all winter long!


Fingers crossed!

Hello everyone, I know I haven't posted anything interesting, and I promise I will in the next couple of days. In the meantime, I've entered this giveaway for this fantastically cool yarn bowl. Keep your fingers crossed and maybe I'll win!! Check out the Bubiknits blog!

Wednesday, January 4, 2012

update

Hi! I'm trying to update my blog and still trying to figure out exactly how this works, so please bear with me. Thanks!

Saturday, December 24, 2011

Just in time to say Merry Christmas!

Well, I must apologize, because I've had no time to post, but I wish everyone a very Merry Christmas (if you celebrate it) and  Happy New Year!!!

Wednesday, November 16, 2011

Change of Season (and crafts to go with it!)

Although I was born in Summer, my favorite seasons are Spring and Fall. Why? Because I love the change of color, and luckily, here there's a lot of it!  It's true, Fall officially started a few weeks back, but we had sort of an Indian Summer and so the leaves are really beautiful shades of yellow red and brown right now. The best time to collect and press them, so that's what I did!

The truth is, I was planning on making this last year, but never got around to it, so it was haunting me. Although it takes a couple of days to make (because of drying time) it is SO worth it and the pictures really don't do it justice. I love to change the decorations in the house according to the season and this fits perfectly, it would also make a nice centerpiece for your Thanksgiving table, although I've already made something else. So, go gather some leaves, place them flat in between two (or more) sheets of newspaper, or paper towel, then place them on a flat surface, cover with more paper and put some heavy books on them so that they're completely covered. Leave them like that for several days (mine were there a week). When they're nice and dry and flat, you're ready to start.

You'll need:
rice paper for decoupage, I like voile(the thin stuff), but thicker is okay, however, it will be more opaque.
a mixture of craft of Elmer's glue and water.60/40 is about right, but I just play it by ear (or eye, if your speaking Italian ) It's best if you make it up in a closeable jar, so you can save it between drying times.
2 medium sized paint brushes
Leaves
Varnish (optional)
Hurricane or glass container or jar
an Exacto or craft knife

First, tear your rice paper into fairly big pieces, as in the top photo. The second photo shows a straight edge, you DON'T want that, or the seem is likely to show. Line your work surface with a plastic table cloth or something non-stick.  Place the paper aside and paint the glue mixture onto the hurricane like so:


Then carefully place your rice paper onto the glass, slightly overlapping it so that there are no holes. Cover the entire jar and if you can't fit the paper eveny to the top seem, don't worry, just let it stick out over the edge. Once it's completely covered, give it another paint-over with the glue mixture, this will make sure that it's wet enough so that the overlapping  doesn't show when it's dry. DO NOT overdo it though or the paper will tear.Let dry for a couple of hours.
When it's dry, take an exacto knife and trim the edge.
Now, repaint the whole thing with the glue mix and then, one at a time, paint the back of the leaves and place them where you want them to go. Be patient and careful, so that they don't break. Hold them a second until they stick and paint over the top too.
Unfortunately, my batteries died here so I didn't get of a pic of the leaves being placed, but you get the idea....
Once you have finished covering the glass, paint over and let it dry for several hours or over night. When it was dry I painted it again because some of the leaves weren't flat. If your stems stick out, you can cut them at the base of the leaf and glue them on seperately, as close as possible. When it's completely dry, add a coat or two of varnish to protect it. That's it! A beautiful fall hurricane. I hope you liked the tutorial.


Thursday, November 3, 2011

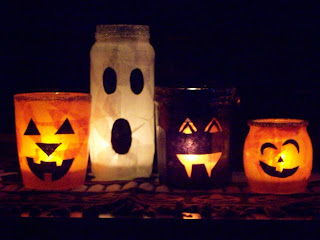
Jar-o-Lanterns

What?? Just when you thought Halloween was over............. Here I am! Better late than never!!! Well, I really wanted to post on Halloween , but I was just TOO busy. Anyway, since this really is supposed to be a craft blog, I thought I would post this just the same and that'll give you plenty of time to make them for next year!  There were plenty of these going ,or "floating" I should say, around the web. I saw them and just HAD to make them, in a hurry, since I was super busy organizing my huge Halloween event.  These actually took me way back to when I was a little girl because I remember making "stained glass jars" with the same technique. I have actually decided to make some of these cuties for Christmas too, so I'll post when I do. Anyway, all you need is some colored tissue paper, scissors, craft clue or mod podge,a paint brush, jars and a clear glaze(optional) oh, and some glitter if you'd like. First , dilute your glue with a little water, about 60/40( I just wing it), then tear your background tissue paper into pieces .You can use a whole piece if you don't like the stained glass effect, but you'll need to measure it by wrapping it around your jar before starting and cutting it at the correct height too. Then, paint your jar with the glue mixture, being careful to drip the excess off the brush before painting, and apply your tissue paper. While that's drying, cut out your silly or scary faces or anything else you want to use. With an almost dry brush, carefully paint  glue mix onto the face parts and position them on the jar. I usually go over the whole jar with a bit of glue to make sure it all sticks well, but don't touch the face parts or they are bound to move. let dry well and if you'd like use some glaze or flatting to seal. I used the non-toxic type that's used for wooden toys. It's safer and almost odorless.Last, but not least; a little glue mixture around the top, then dip it in the glitter of your choice , and Voilà or should I say BOO! There is your spooky jar-o-lantern.  My favorite is the goofy- faced one!