Pages

Saturday, December 24, 2011

Just in time to say Merry Christmas!

Well, I must apologize, because I've had no time to post, but I wish everyone a very Merry Christmas (if you celebrate it) and  Happy New Year!!!

Wednesday, November 16, 2011

Change of Season (and crafts to go with it!)

Although I was born in Summer, my favorite seasons are Spring and Fall. Why? Because I love the change of color, and luckily, here there's a lot of it!  It's true, Fall officially started a few weeks back, but we had sort of an Indian Summer and so the leaves are really beautiful shades of yellow red and brown right now. The best time to collect and press them, so that's what I did!

The truth is, I was planning on making this last year, but never got around to it, so it was haunting me. Although it takes a couple of days to make (because of drying time) it is SO worth it and the pictures really don't do it justice. I love to change the decorations in the house according to the season and this fits perfectly, it would also make a nice centerpiece for your Thanksgiving table, although I've already made something else. So, go gather some leaves, place them flat in between two (or more) sheets of newspaper, or paper towel, then place them on a flat surface, cover with more paper and put some heavy books on them so that they're completely covered. Leave them like that for several days (mine were there a week). When they're nice and dry and flat, you're ready to start.

You'll need:
rice paper for decoupage, I like voile(the thin stuff), but thicker is okay, however, it will be more opaque.
a mixture of craft of Elmer's glue and water.60/40 is about right, but I just play it by ear (or eye, if your speaking Italian ) It's best if you make it up in a closeable jar, so you can save it between drying times.
2 medium sized paint brushes
Leaves
Varnish (optional)
Hurricane or glass container or jar
an Exacto or craft knife

First, tear your rice paper into fairly big pieces, as in the top photo. The second photo shows a straight edge, you DON'T want that, or the seem is likely to show. Line your work surface with a plastic table cloth or something non-stick.  Place the paper aside and paint the glue mixture onto the hurricane like so:


Then carefully place your rice paper onto the glass, slightly overlapping it so that there are no holes. Cover the entire jar and if you can't fit the paper eveny to the top seem, don't worry, just let it stick out over the edge. Once it's completely covered, give it another paint-over with the glue mixture, this will make sure that it's wet enough so that the overlapping  doesn't show when it's dry. DO NOT overdo it though or the paper will tear.Let dry for a couple of hours.
When it's dry, take an exacto knife and trim the edge.
Now, repaint the whole thing with the glue mix and then, one at a time, paint the back of the leaves and place them where you want them to go. Be patient and careful, so that they don't break. Hold them a second until they stick and paint over the top too.
Unfortunately, my batteries died here so I didn't get of a pic of the leaves being placed, but you get the idea....
Once you have finished covering the glass, paint over and let it dry for several hours or over night. When it was dry I painted it again because some of the leaves weren't flat. If your stems stick out, you can cut them at the base of the leaf and glue them on seperately, as close as possible. When it's completely dry, add a coat or two of varnish to protect it. That's it! A beautiful fall hurricane. I hope you liked the tutorial.


Thursday, November 3, 2011

Jar-o-Lanterns

What?? Just when you thought Halloween was over............. Here I am! Better late than never!!! Well, I really wanted to post on Halloween , but I was just TOO busy. Anyway, since this really is supposed to be a craft blog, I thought I would post this just the same and that'll give you plenty of time to make them for next year!  There were plenty of these going ,or "floating" I should say, around the web. I saw them and just HAD to make them, in a hurry, since I was super busy organizing my huge Halloween event.  These actually took me way back to when I was a little girl because I remember making "stained glass jars" with the same technique. I have actually decided to make some of these cuties for Christmas too, so I'll post when I do. Anyway, all you need is some colored tissue paper, scissors, craft clue or mod podge,a paint brush, jars and a clear glaze(optional) oh, and some glitter if you'd like. First , dilute your glue with a little water, about 60/40( I just wing it), then tear your background tissue paper into pieces .You can use a whole piece if you don't like the stained glass effect, but you'll need to measure it by wrapping it around your jar before starting and cutting it at the correct height too. Then, paint your jar with the glue mixture, being careful to drip the excess off the brush before painting, and apply your tissue paper. While that's drying, cut out your silly or scary faces or anything else you want to use. With an almost dry brush, carefully paint  glue mix onto the face parts and position them on the jar. I usually go over the whole jar with a bit of glue to make sure it all sticks well, but don't touch the face parts or they are bound to move. let dry well and if you'd like use some glaze or flatting to seal. I used the non-toxic type that's used for wooden toys. It's safer and almost odorless.Last, but not least; a little glue mixture around the top, then dip it in the glitter of your choice , and VoilĂ  or should I say BOO! There is your spooky jar-o-lantern.  My favorite is the goofy- faced one!

Tuesday, October 18, 2011

Cozy Shoulders

Hi everybody! It's been awhile since I've posted, but nonetheless, my hands have been busy!! Here is my latest creation, a capelet or shoulder cover. This is super easy, so it's great for beginners and it works up very fast.  There are no increases, but it naturally widens a little. Since it's not a poncho, it fits snugly around your shoulders. I have added a ribbon, but you can embellish it as you like.

This pattern was created by me, so please do not sell it, claim the pattern or pictures as your own.  You may use it and share it and sell your finished product if you'd like, but please refer any questions or credit to this blog. All terms are American English, so British should adapt( There is a quick reference here.) Enjoy!

If you would like a more off the shoulder look, make a longer beginning chain (taking care not to make it so wide that it falls off.). Please do this for larger sizes as well. This pattern is a S/M .

 You will need a 9.0 mm (N) hook , no. 5  bulky yarn (I used Lionbrand Homespun) , a tapestry needle, ribbon about three times the width of  the first round of your capelet.

Terms: CH = chain, sl st = slip stitch, tr = treble crochet, dc = double crochet, beg = beginning

CH 54

Taking care not to twist the chain, join with a sl st.

Round 1: CH 3,work tr in each st around, sl st in 3rd ch of beg CH 3 to join

Round 2: CH 2, work dc into each SPACE ( NOT stitch) of the tr in the first round, sl st into 2nd ch of beg CH 2 to join

Round 3: CH 2, work dc into each space of the dc in round 2, sl st into 2nd ch of beg CH 2 to join

Round 4: CH 3, work tr into each space of the dc in round 3, sl st into 3rd ch of beg CH 3

Repeat rows 2,3,4 twice and then round 4 once more, so that you end with two rounds of tr. Fasten off, and sew in ends.  With your ribbon, go through every other tr st in round 1 and tie a bow. That's it! No more cold shoulders :)  This is what it looks like on (sorry, but I had to take the picture myself!)

If you have any questions, feel free to comment here or by pm on ravelry.


Friday, September 23, 2011

Creative Juices

I wonder what it is that gets those creative juices flowing? I don't know if it's the change of season or what, but my mind is just full of ideas of what to make. So many that I'm afraid I'll forget some of them! My kids have commented that I often stand in the middle of a room and sort of space out,  occasionally making senseless comments , so I have started writing them down .Either creativity has struck, or I am losing a few marbles!

I think this is a common thing among creative people of any kind. Look at writers, they get on a roll and can finish a whole book! Other times thy get writers block and can't work at all!  The same goes for artists. I have a relative who reproduces Leonardo Da Vinci's machines. He has made several of them, all meticulously produced in wood, stone and linen. I will be helping him with an exposition next week and so he was explaining some of Da Vinci's work to me.  Now, I certainly would never compare myself to such a genius, but just think of all the things he did, how his mind worked and all the sketches he drew of his inventions, many of which we still use today. Yet he never built them, most were only on paper. I should think because his mind had already moved on to his next masterpiece. What an incredible rush of creativity!

With all these things in my mind that I wish to create, my only problem is not having enough time! I have three WIP's right now and many to do's on the list, I have a feeling the next post will be filled with pictures!! Stay tuned..........


Monday, September 12, 2011

Happy International Crochet Day !!

Just a message to wish everyone a Happy International Crochet Day!! Get out your hooks and do it in public!! Keep your eyes open, I'll be posting soon!

Thursday, September 8, 2011

Tubular Flounce Cowl or Boa Scarf tutorial

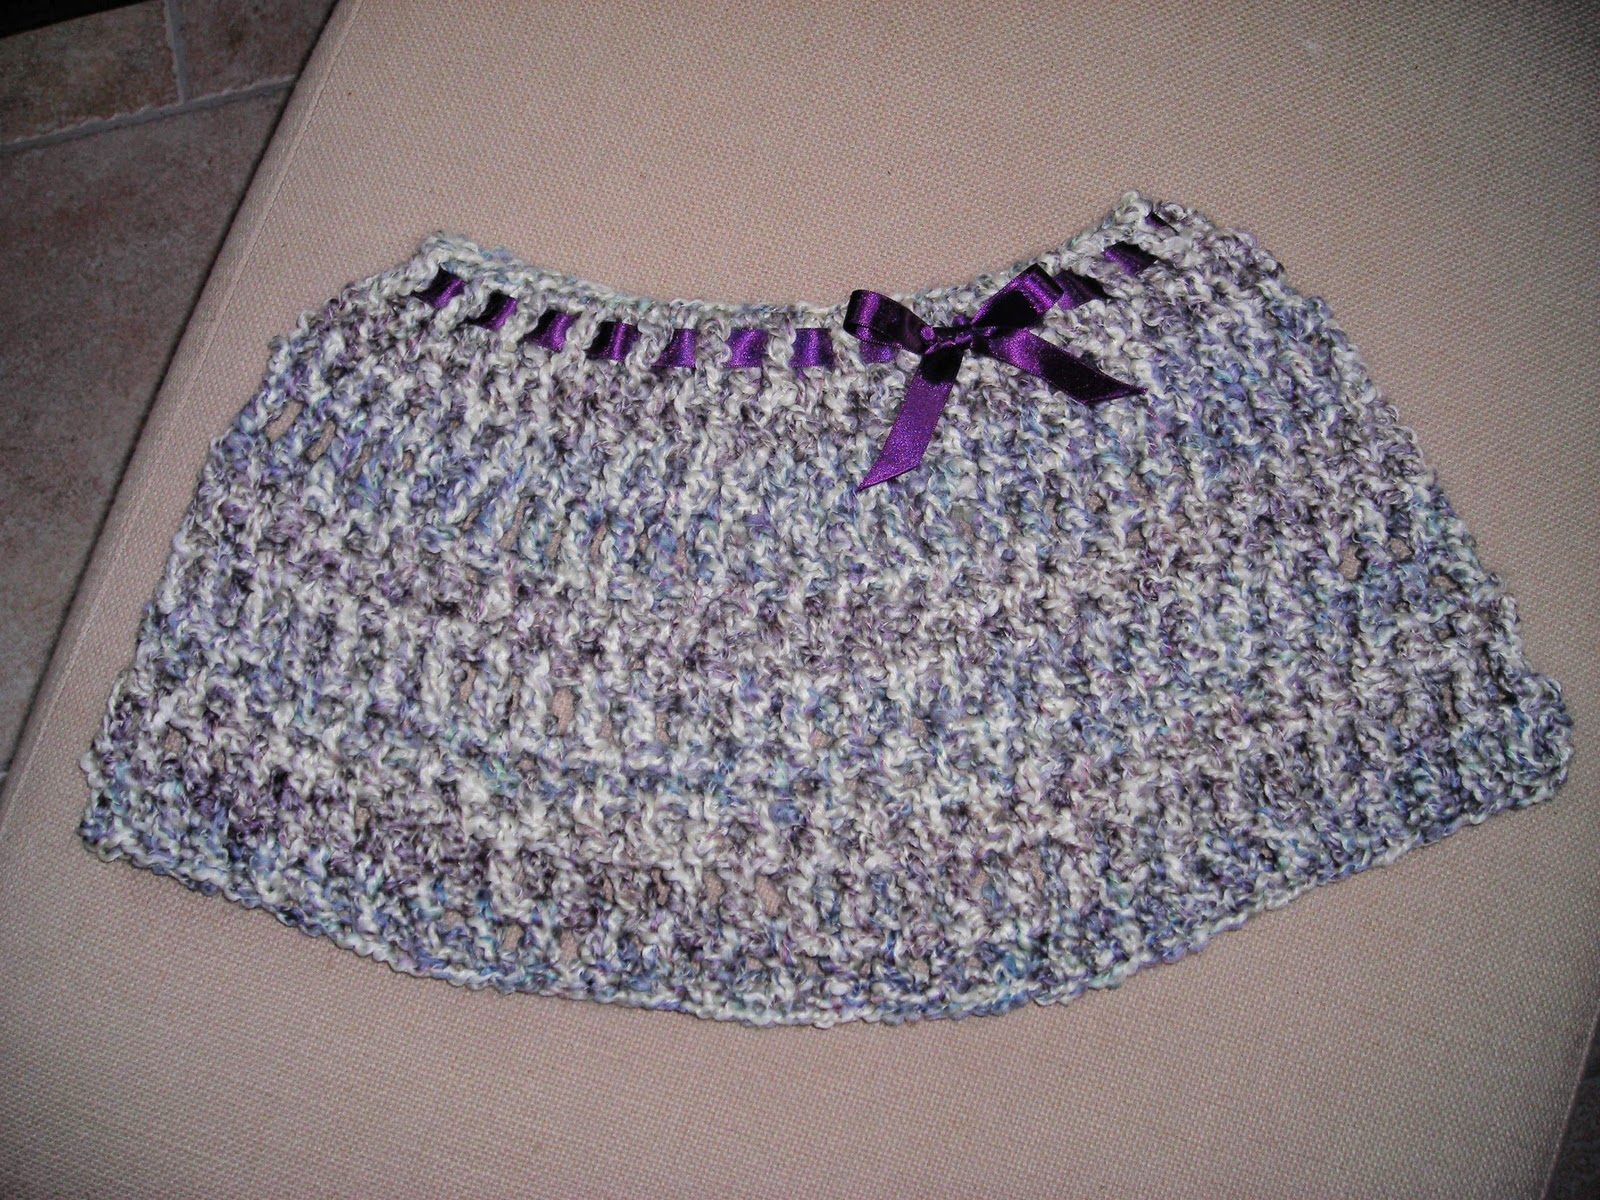
Well, here it goes! Wish me luck on my first photo tutorial! I made another cowl with flounce and decided to try a tubular version with this lovely, wool bordered, flounce. It was originally supposed to be a Boa scarf, but, after 2 skeins, I decided to make a cowl instead. This is because since I paid €4 a skein, it was getting a bit expensive and when I sell it, I certainly wouldn't be able to raise the price to cover the cost, unless my work was free! I think it came out well as a cowl, too.

A note before starting: This is easy, but time consuming. If you've never used flounce before, it takes awhile to get used to, so if your looking for a quick project, this probably isn't it. Crochet loosely, flounce is not friendly to tight stitches. Also, be sure to mark the first stitch in each round. I use a paper clip (thank you futuregirl) it's easy to close too! After each round, count your stitches, It's easy to add in extras but if you check each round before starting a new one, you can rip a small amount.

This pattern was designed by me so please do not sell any part of it, or take credit for the pattern and photos. You may share this pattern with others free of charge. As for the items you make using it, you may sell them, but please refer people to my blog if they ask about it.

Now to work!

You'll need:  a K hook(6.5 mm), stitch marker,tapestry needle, 55 yards (50 meters) of flounce for the cowl  or 110 yards (100 meters) for a scarf, patience(lol)

All terms in this pattern are American, for British, please adapt. This is worked in dc, but tr crochet works up nicely too. If you choose tr remember to ch 4.

Since you can't make a regular starting knot, here's what you do ; open your flounce and, leaving about an inch tail (2cm), insert your hook inot the middle of the flounce net, then, using about1/3 of the flounce(stick your hook through),yarn over and pull through. this is considered your knot. Do not count as a stitch.


Now, doing the same thing, ch 9. Please open your flounce as you go, it makes it easier to work with. Then join in a circle with the 9th stitch from hook (the first you made),  ch 3 (or 4 for treble)
Now, dc around until you get to the ch3.dc into the 3rd ch of ch3 and place your stitch marker here (this is your first stitch of the secound round). This is not something you can normally do in crochet, because you would see the gap, and it would look messy, but with flounce you can,because it's covered by the ruffles. If you would like to be more precise, you could sl st at the end of the round,ch 3(or 4) and continue on.

Continue working in spirals until desired length is reached.
If you're making the cowl, make it just a little roomy around the neck.


It looks something like this as you're going along.
 Now for fastening off. When you've completed the last stitch of the round, put your hook through the first, and YO with ALL of the flounce. Now sl st.

Now YO again with ALL the flounce and pull through, making a knot. Weave in end. I also threaded a tapestry needle and went down a row and knotted around two stitches for safety,then cut closely. The great thing is you can't see the knots because they're hidden by the ruffles! Sew in and knot tail at other end.

If you're making the cowl, you will need to make a chain using all the flounce, about one and a half times your cowl. On the last chain,take out your hook and insert a tunisian hook, or the longest hook you have into the middle of the cowl,squish it down as far as possible onto the hook, insert the hook into the last chain you made, pull yarn tight around hook and CAREFULLY pull hook and chain through the cowl. It may take a couple of tries to get it through. (Don't forget to leave out a peace at the other end!) Knot off both ends of string and cut!


That's it! Now you'll be warm and beautiful!


I hope you enjoy the pattern, if you have any questions or problems, feel free to contact me by leaving a comment or on ravelry.


Wednesday, August 24, 2011

Sadness

I know this blog is supposed to be about creativity, but something terrible happened, and I just can't help but write about it.  Yesterday we found out that our beloved cat Felix suffered a terrible fate. The other night we were out on the terrace, playing a board game and he was with us.  Suddenly an ambulance came rushing up the street with it's siren on and scared him so much he darted out across the street,into the neighbors' yard and when he tried to pass through their fence to another yard, his collar got caught.

I suppose if you aren't an animal lover, you won't understand this, but I am devastated. We got him when he was only a few weeks old.  He was found abbandoned in a box in the park with his brothers and sisters and we couldn't help but love him right away.  He had such personality, he was almost human. He loved to be outside and was a real hunter, but was VERY affectionate too and always wanting to be cuddled. As you can see he was a beautiful cat and I used to tease him by calling him "Brutto" which means ugly in Italian, because everyone else was always saying how beautiful and soft he was.  Yesterday afternnon my neighbor came and told me he had found him and last night we buried him.  Since I found out, I can't stop crying. He was so special to us.

I have lost many animals in my lifetime, but this is definitely going to be the hardest to get over.

Goodbye Felix. We love you and you'll always have a special place in our hearts♥
:'(

Friday, August 19, 2011

Back pain and company aren't good for crochet

This is going to be a short post and I don't have pictures to put up because I haven't been crocheting much.  My back has been bothering me and the whole family has been home which means virtually no time for creativity! :(
 Hopefully next week will be more productive! I really need to start working on some more items for the Christmas markets, but I am still not so sure about what will sell?? If anyone reading this has any ideas, I'd love your comments!

Monday, August 1, 2011

work, work, work


Well, here I am, about a week later and I'm happy to say that I've finished a few wips! I have also started and finshed a few other small projects, which I'll post pics of later. This beautiful handbag (if I do say so myself!), is the starling handbag, a pattern from futuregirl's blog, She has an incredible tutorial for the lining which I always use too. I made this for one of my best friends, now I just have to give it to her! The hotpad I made I am planning on selling. Yes, I have decided to start working A LOT crocheting, so that I can sell some things at some of the Christmas markets. Obviously, I'll  need to make several different items and things which I think people would buy.  It's not as easy as it sounds........ I think I'll do a little of everything in different price ranges and I'd like to find some unique patterns. Since crocheting with thicker fibers isn't really common here, (most people here in Italy use thread for filet crochet or doily type projects) I hope people will be pleasantly surprised. I guess I'll just have to see. If not, then I'll have lots of ready made Christmas gifts!

As far as the baking goes, this week I'm planning on a German Chocolate Cake.  My birthday is on Thursday and that's my favorite cake. DH is out of town on business and so it's just me and the kids, and they don't like coconut frosting, but it is MY birthday, right? So there! ;)

A presto!

Friday, July 22, 2011

Something Sweet

Well, Let's start with someting sweet........... Please excuse my food photography, which is not exactly fantastic! I only have a little Nikon, nothing professional and it works fine for taking pictures of people and crochet, which is mostly what I use it for anyway. But I certainly don't get that professional look when it comes to food. Definitely something I'll have to work on!

Baking is a big part of my life. I love to do it. I love the way the house smells when something is in the oven and I don't like giving my kids store-bought junk, so Imake at least 3 cakes or baked goods a week. That obviously increases around the holidays, birthdays etc...

Today I made blondies without nuts, since the kids don't like them, and I won't be eating them :( !! Two suggestions if you are going to make them; add 1 tsp of corn syrup to your recipe. This makes for a wonderful, chewy blondie and watch your bake time! Even just a few minutes longer will turn them from soft and moist into hard and too chewy!

As for crochet, I have three WIP's and I hope to finish them this weekend! My plan is to start making as much as I can, so I'll be able to work some of the Christmas markets. We'll see how it goes........

See you soon! Ciao!

Thursday, July 21, 2011

Hello!

Hi Everyone!!  Well, this is my first attempt at blogging, so we'll see how it goes....... bear with me please. Today is just about getting started and saying hello. As soon as I figure out how everything works, there will be a real posting and some pics.